Let's customise your quiz
Here’s the basics you need to know to set up a quiz using NQY.
1. Clone our ready-to-use template
This is the cloneable demo project. Feel free to copy it and use as a starting point or as a reference to check the things are set up.
2. Add the executable code
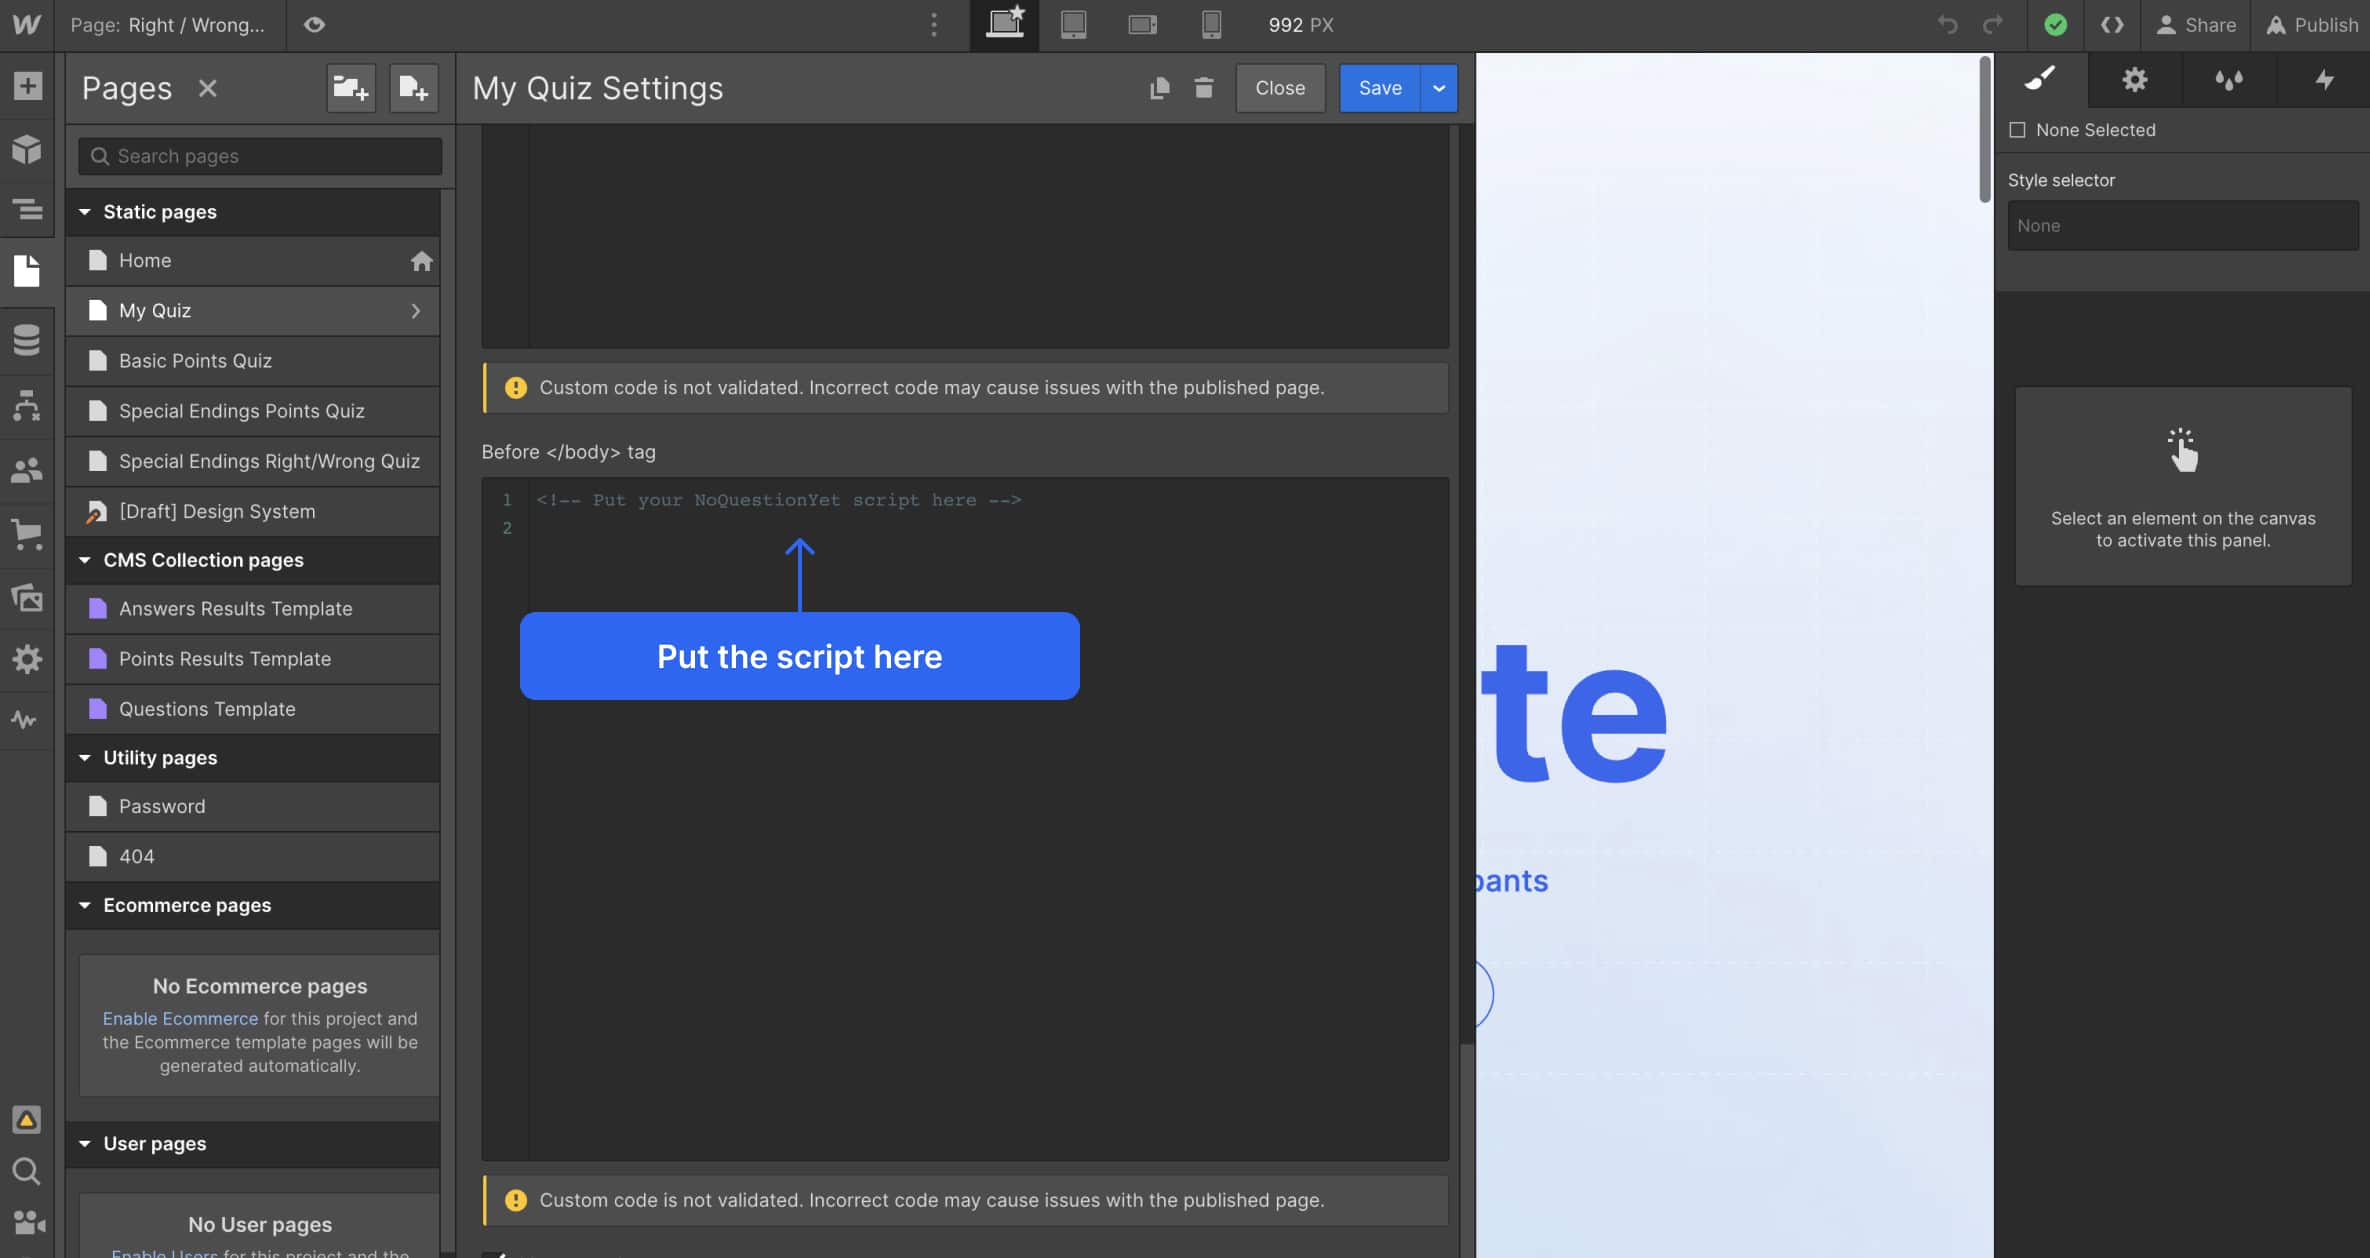
Grab the script below and paste into the custom code before closing </body> tag of the page with your quiz - the flow and scoring won’t work without this.
<!-- NoQuestionYet script-->
<script defer data-quiz-id="0" src="https://nqy.pages.dev/main.js" type="text/javascript"></script>
<script defer data-quiz-id="0" src="https://nqy.pages.dev/main.js" type="text/javascript"></script>
Copy

<!-- NoQuestionYet script-->
<script defer src="https://nqy.pages.dev/main.js" type="text/javascript"></script>
<script defer src="https://nqy.pages.dev/main.js" type="text/javascript"></script>
Copy
3. Copy/paste the components from the library
You know what you’re doing, so copy and paste components from the library as you wish to put together your ideal quiz. BUT there are some necessary attributes you must have to enable the quiz to run.
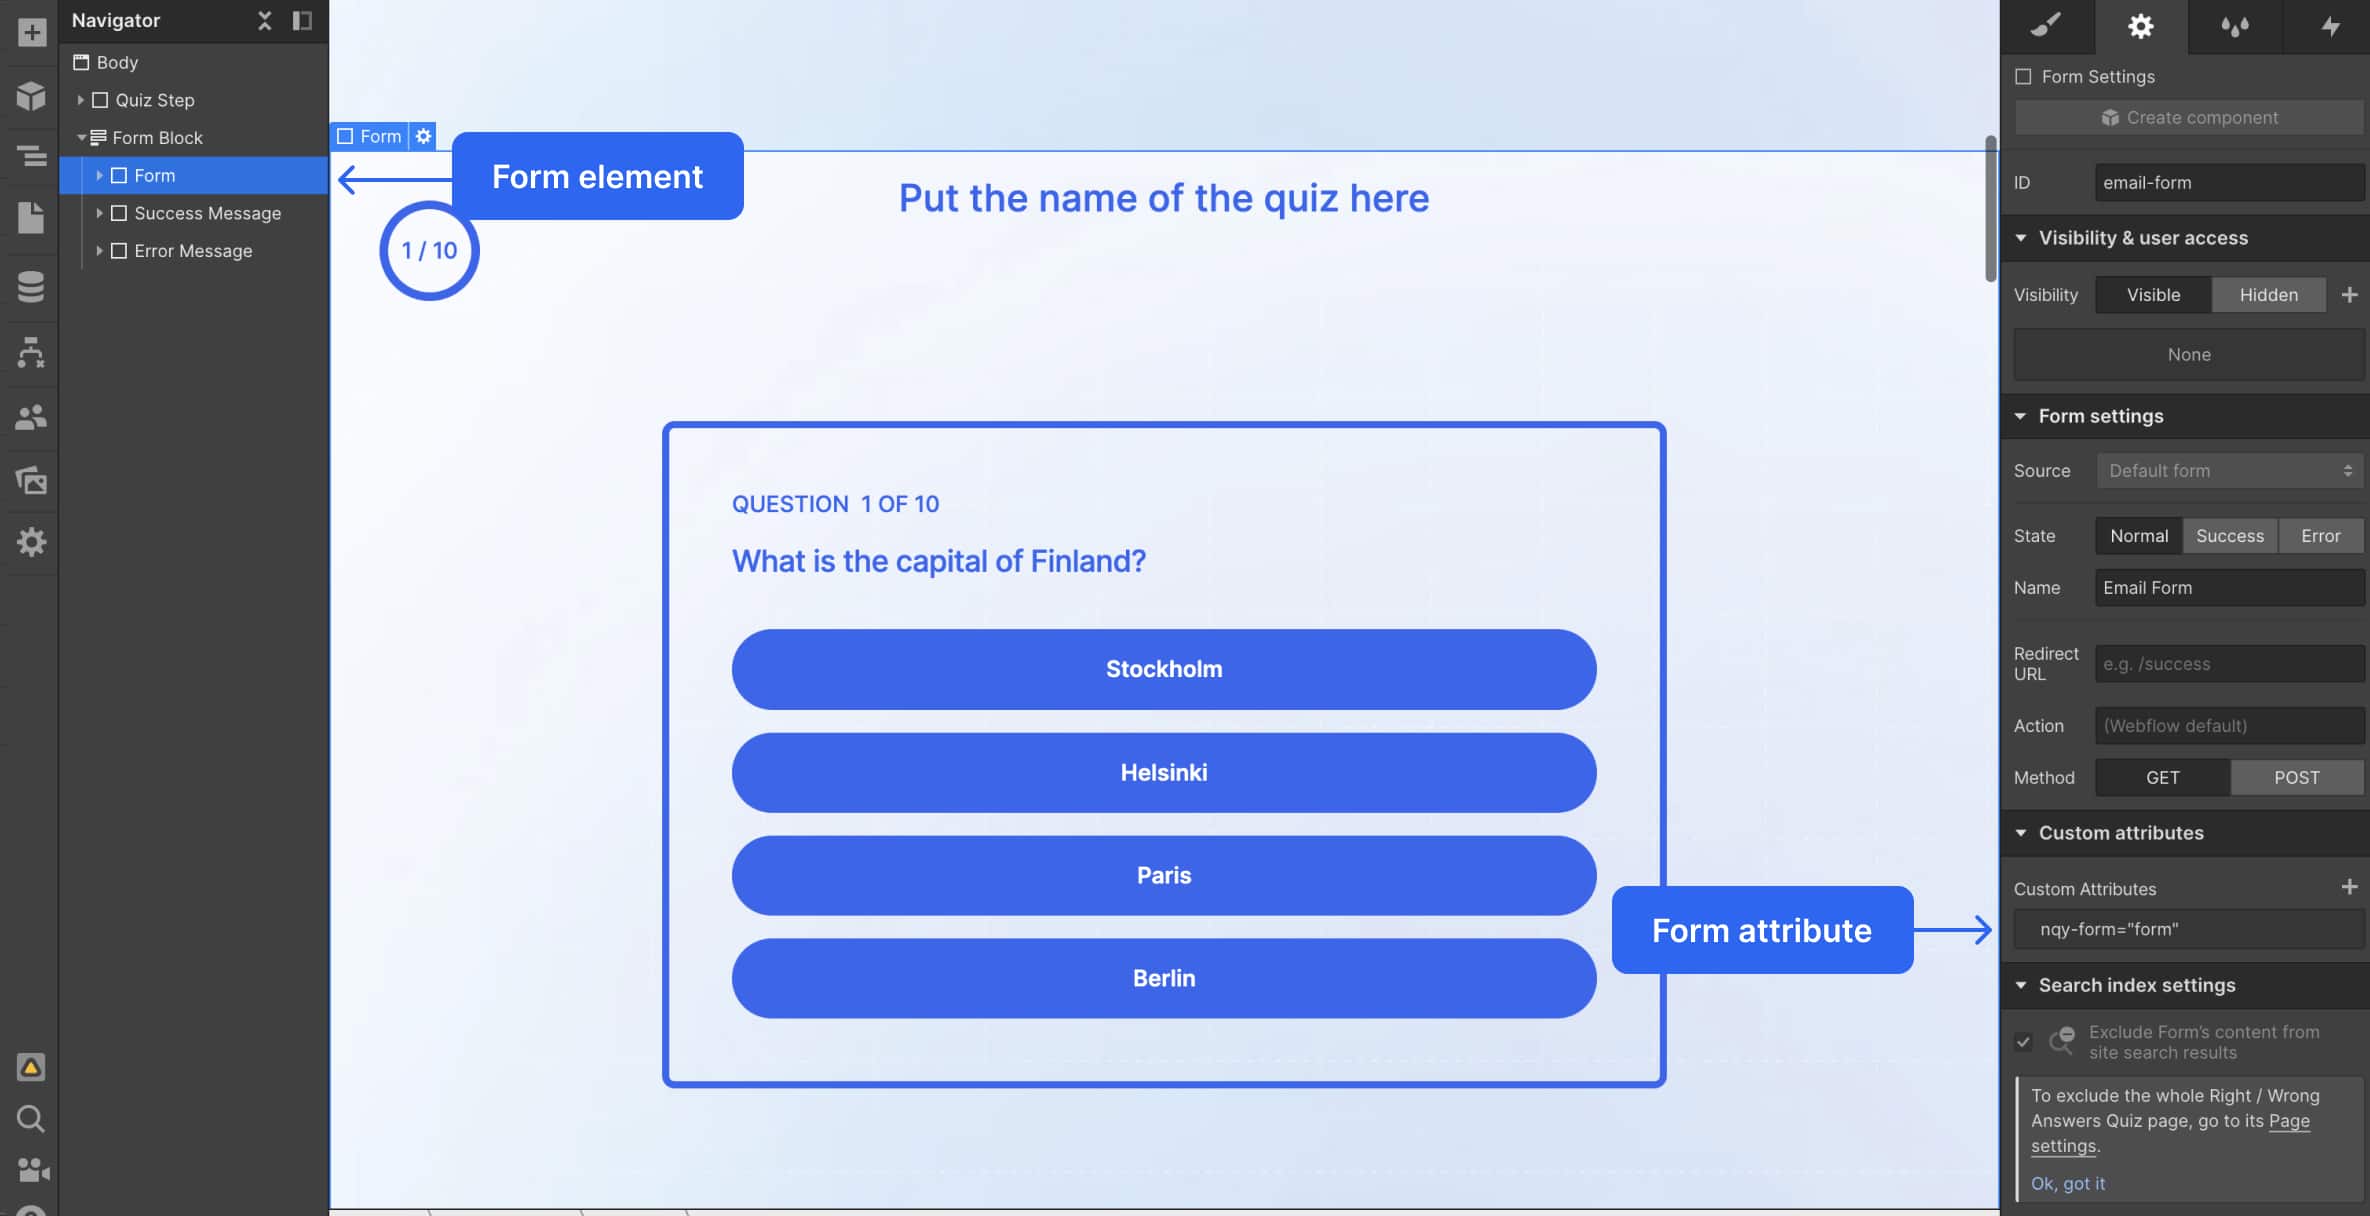
4. Main form
Add a native Webflow form to the page, and set up an attribute nqy-form="form" to the form or form block element. Add form-2, form-3, etc if you want to have more than one form on the page.
To save time, and not worry about adding it, you can copy any “Questions” component, the attribute is already set up in each one!
By default we prevent the form from submitting, so your users can play with the form as much as they want without hitting the form submission limit of Webflow. If you need the default behavior add attribute nqy-behavior="default" to the form element.
5. Form Steps
Form steps can be static or dynamic (come from the CMS). Every quiz step should have an attribute nqy-step="step-n", where n is a step number e.g. nqy-step="step-1" nqy-step="step-2". If you are using CMS collection to store form steps, add a dynamic attribute that would come from the CMS field. The final step should be nqy-step="final". Check the set up for the collection in our cloneable and make your own unique one if you wish.
Don’t style the display of the div-blocks with nqy-step attribute as the style might be overwritten by the script. To avoid unexpected behavior, add another div block inside and style the display of it the way you want. Step block should only indicate which step we are currently on.
Don’t style the display of the div-blocks with nqy-step attribute as the style might be overwritten by the script. To avoid unexpected behavior, add another div block inside and style the display of it the way you want. Step block should only indicate which step we are currently on.

6. Step Triggers
To go to the next step you can use “Next” and “Previous” buttons or radio buttons with answers.
- If you have "Next" buttons as a next step trigger:
Add attributes nqy-action="next" and nqy-destination="step-n" (if you have a specific destination in mind) to every "Next" button
- If you have "Next" and "Previous" buttons:
Add attributes nqy-action="next" and nqy-destination="step-n" (if you have a specific destination in mind) to every "Next" button. Add attribute nqy-action="previous" to every "Previous" button.
- If you have answers radio buttons as a next step trigger:
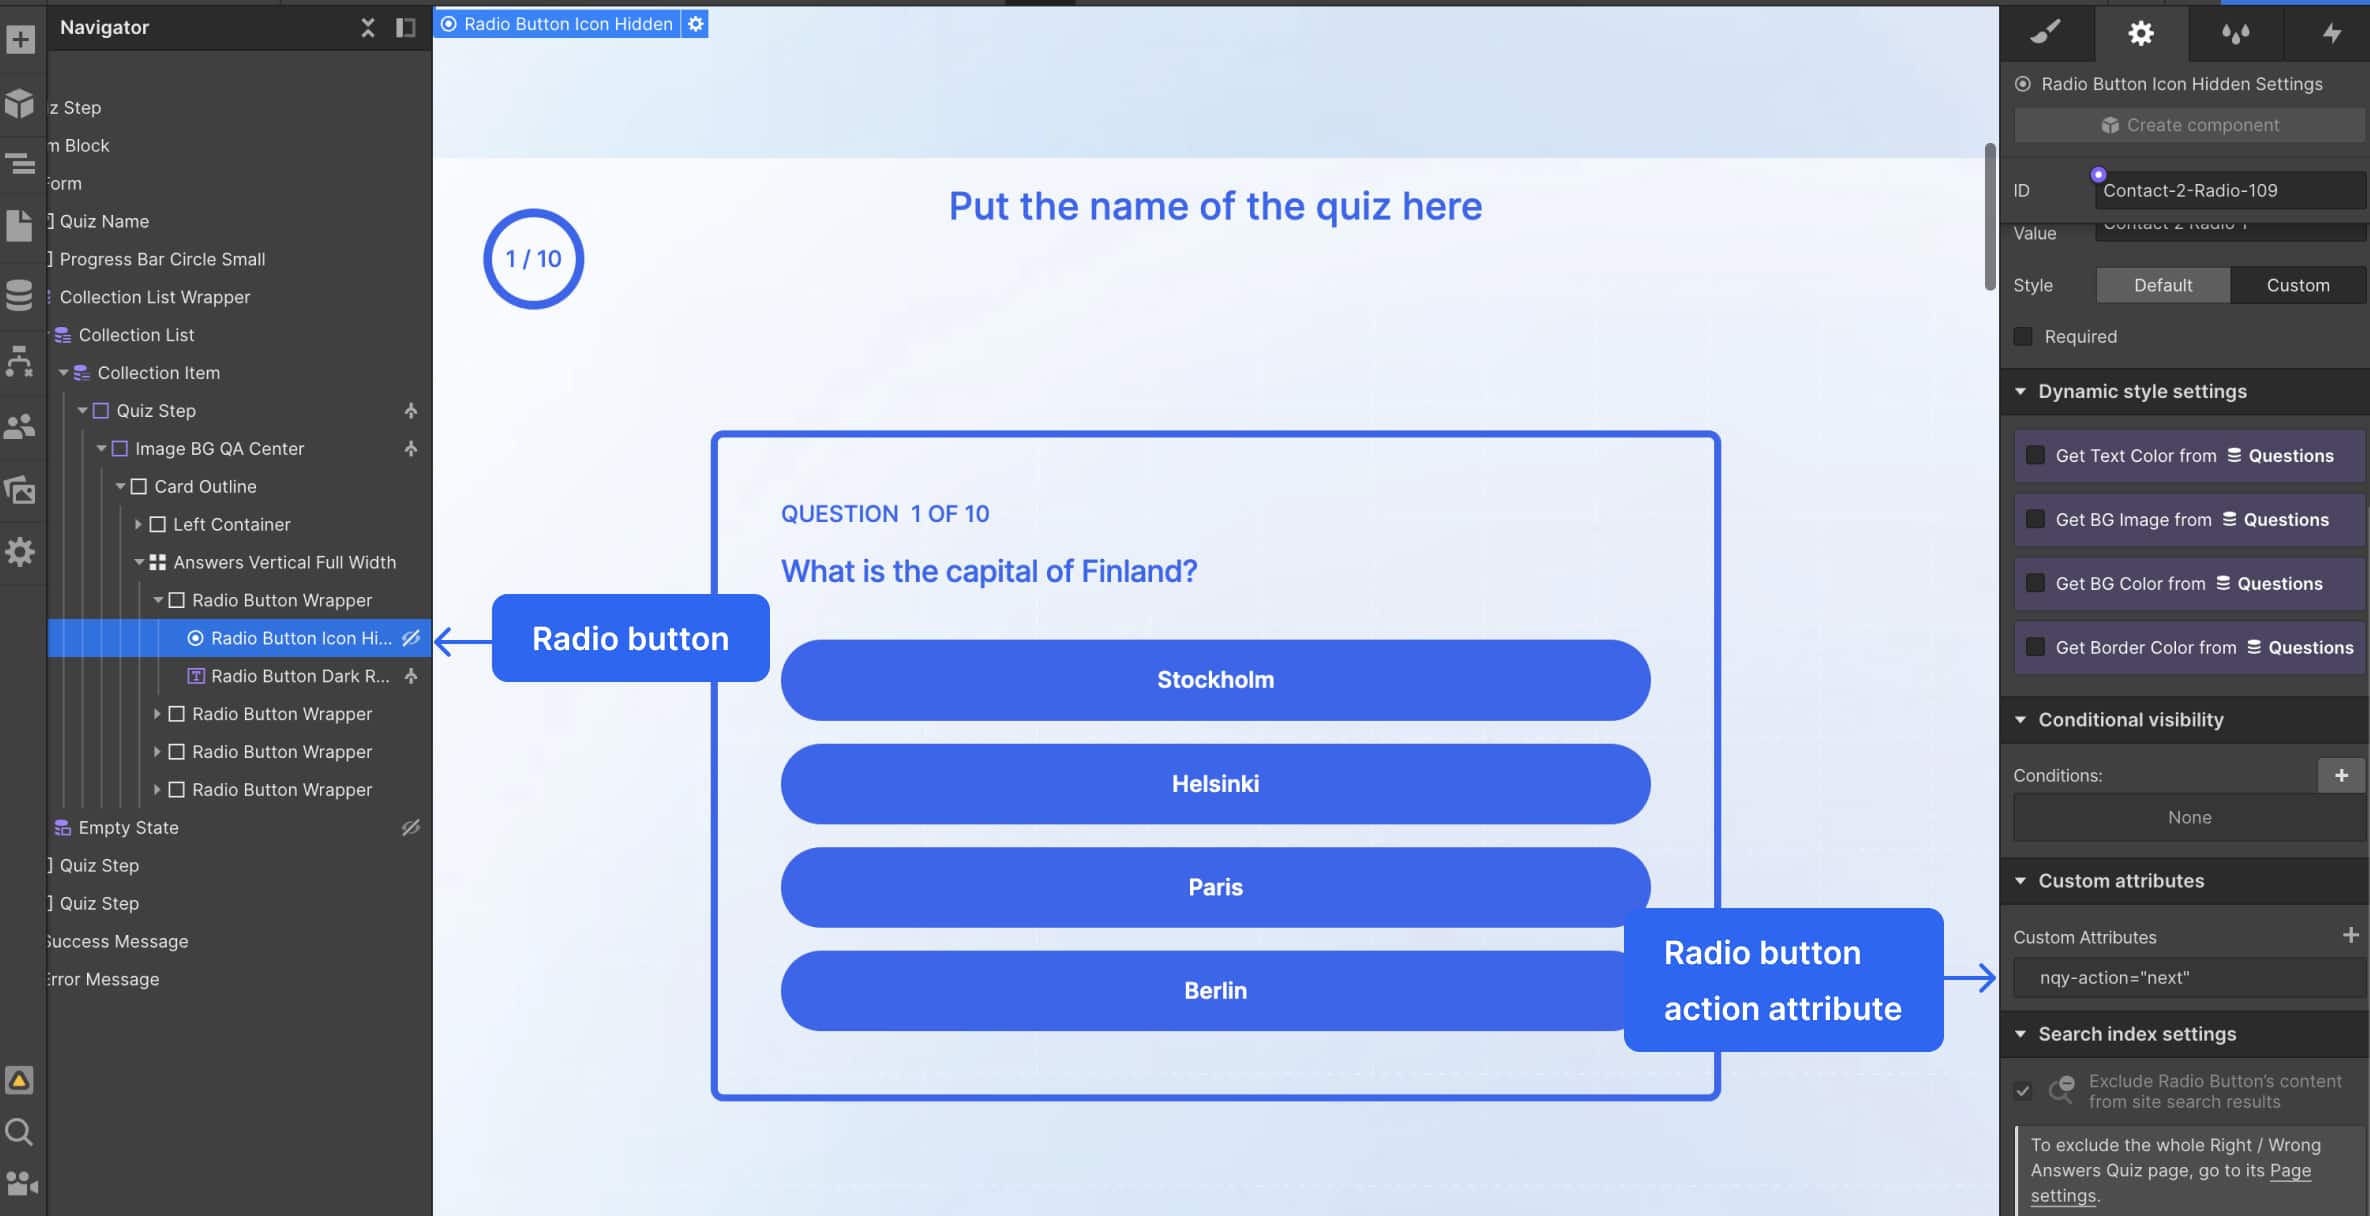
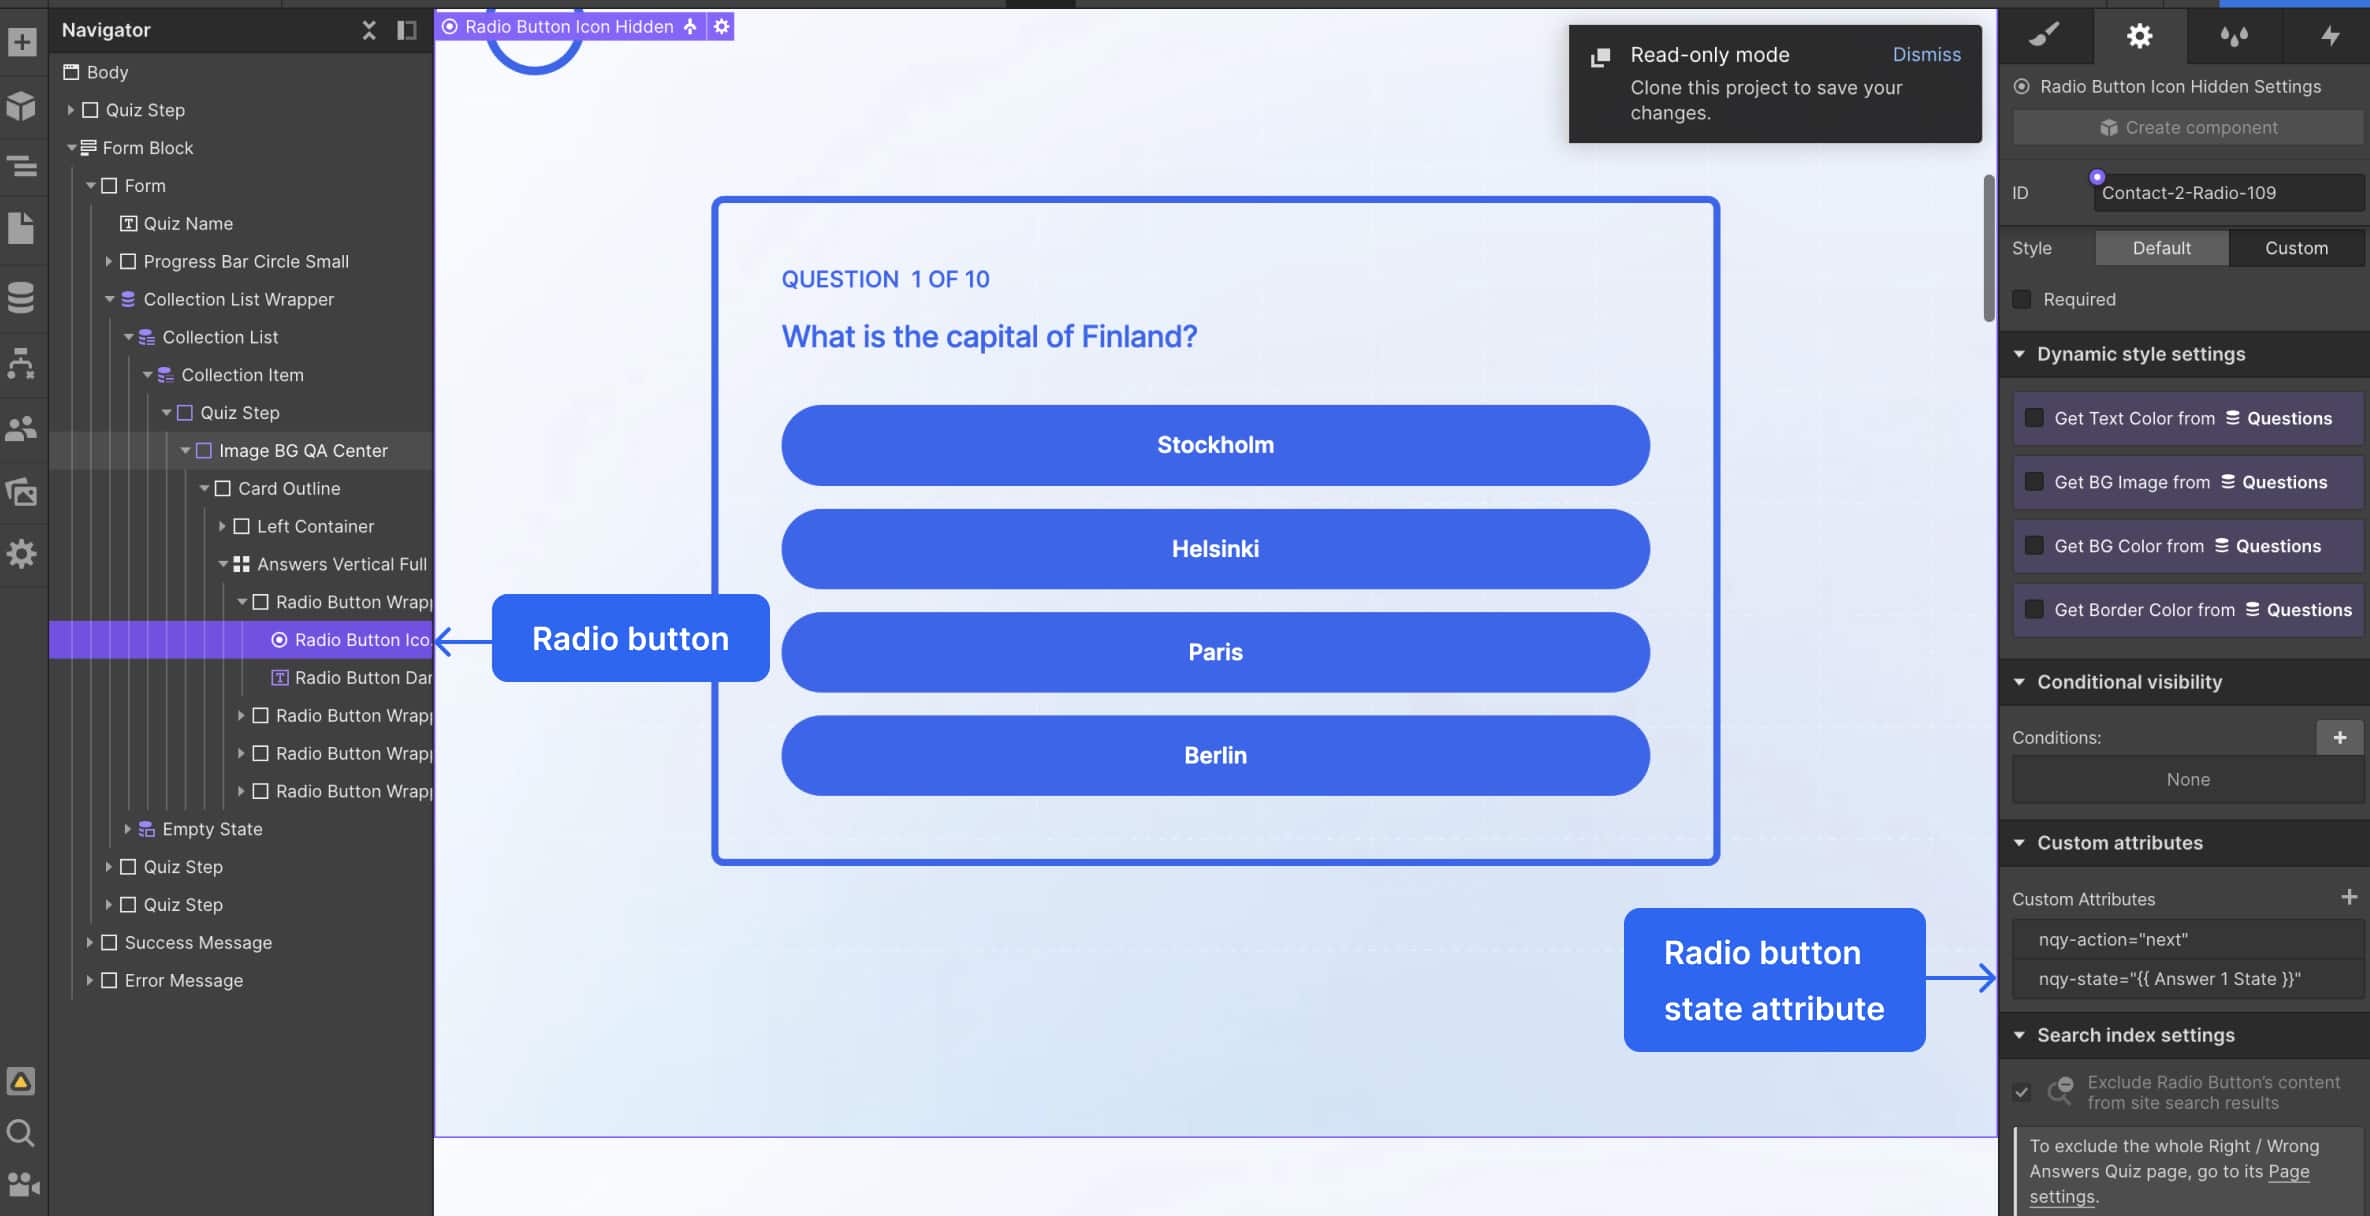
Add attributes nqy-action="next" and nqy-destination="step-n" (if you have a specific destination in mind) to every radio button element (actual radio button with a circle symbol in the navigator).
To create a custom active class for radio buttons and checkboxes (when they are checked) add nqy-form-active class to the radio button/checkbox wrapper.
- If the next step depends on the user's choice (radio button):
To the "Next" button of this question add nqy-action="next" and nqy-conditional="step-conditional" attributes. To every radio button in the question add attribute nqy-destination="step-n" with the number of the desired next step if this option was chosen.
7. Points/States
If you want to add points to each answer: Add nqy-points="n" (example nqy-points="40") to every radio button (actual circle of the radio button)
If you want to add the right answer to each question: Add nqy-state="true" or nqy-state="false" (or leave it blank) to every radio button (actual circle of the radio button)
In the example below the nqy-state attribute value is coming from the CMS.
If you want to add the right answer to each question: Add nqy-state="true" or nqy-state="false" (or leave it blank) to every radio button (actual circle of the radio button)
In the example below the nqy-state attribute value is coming from the CMS.
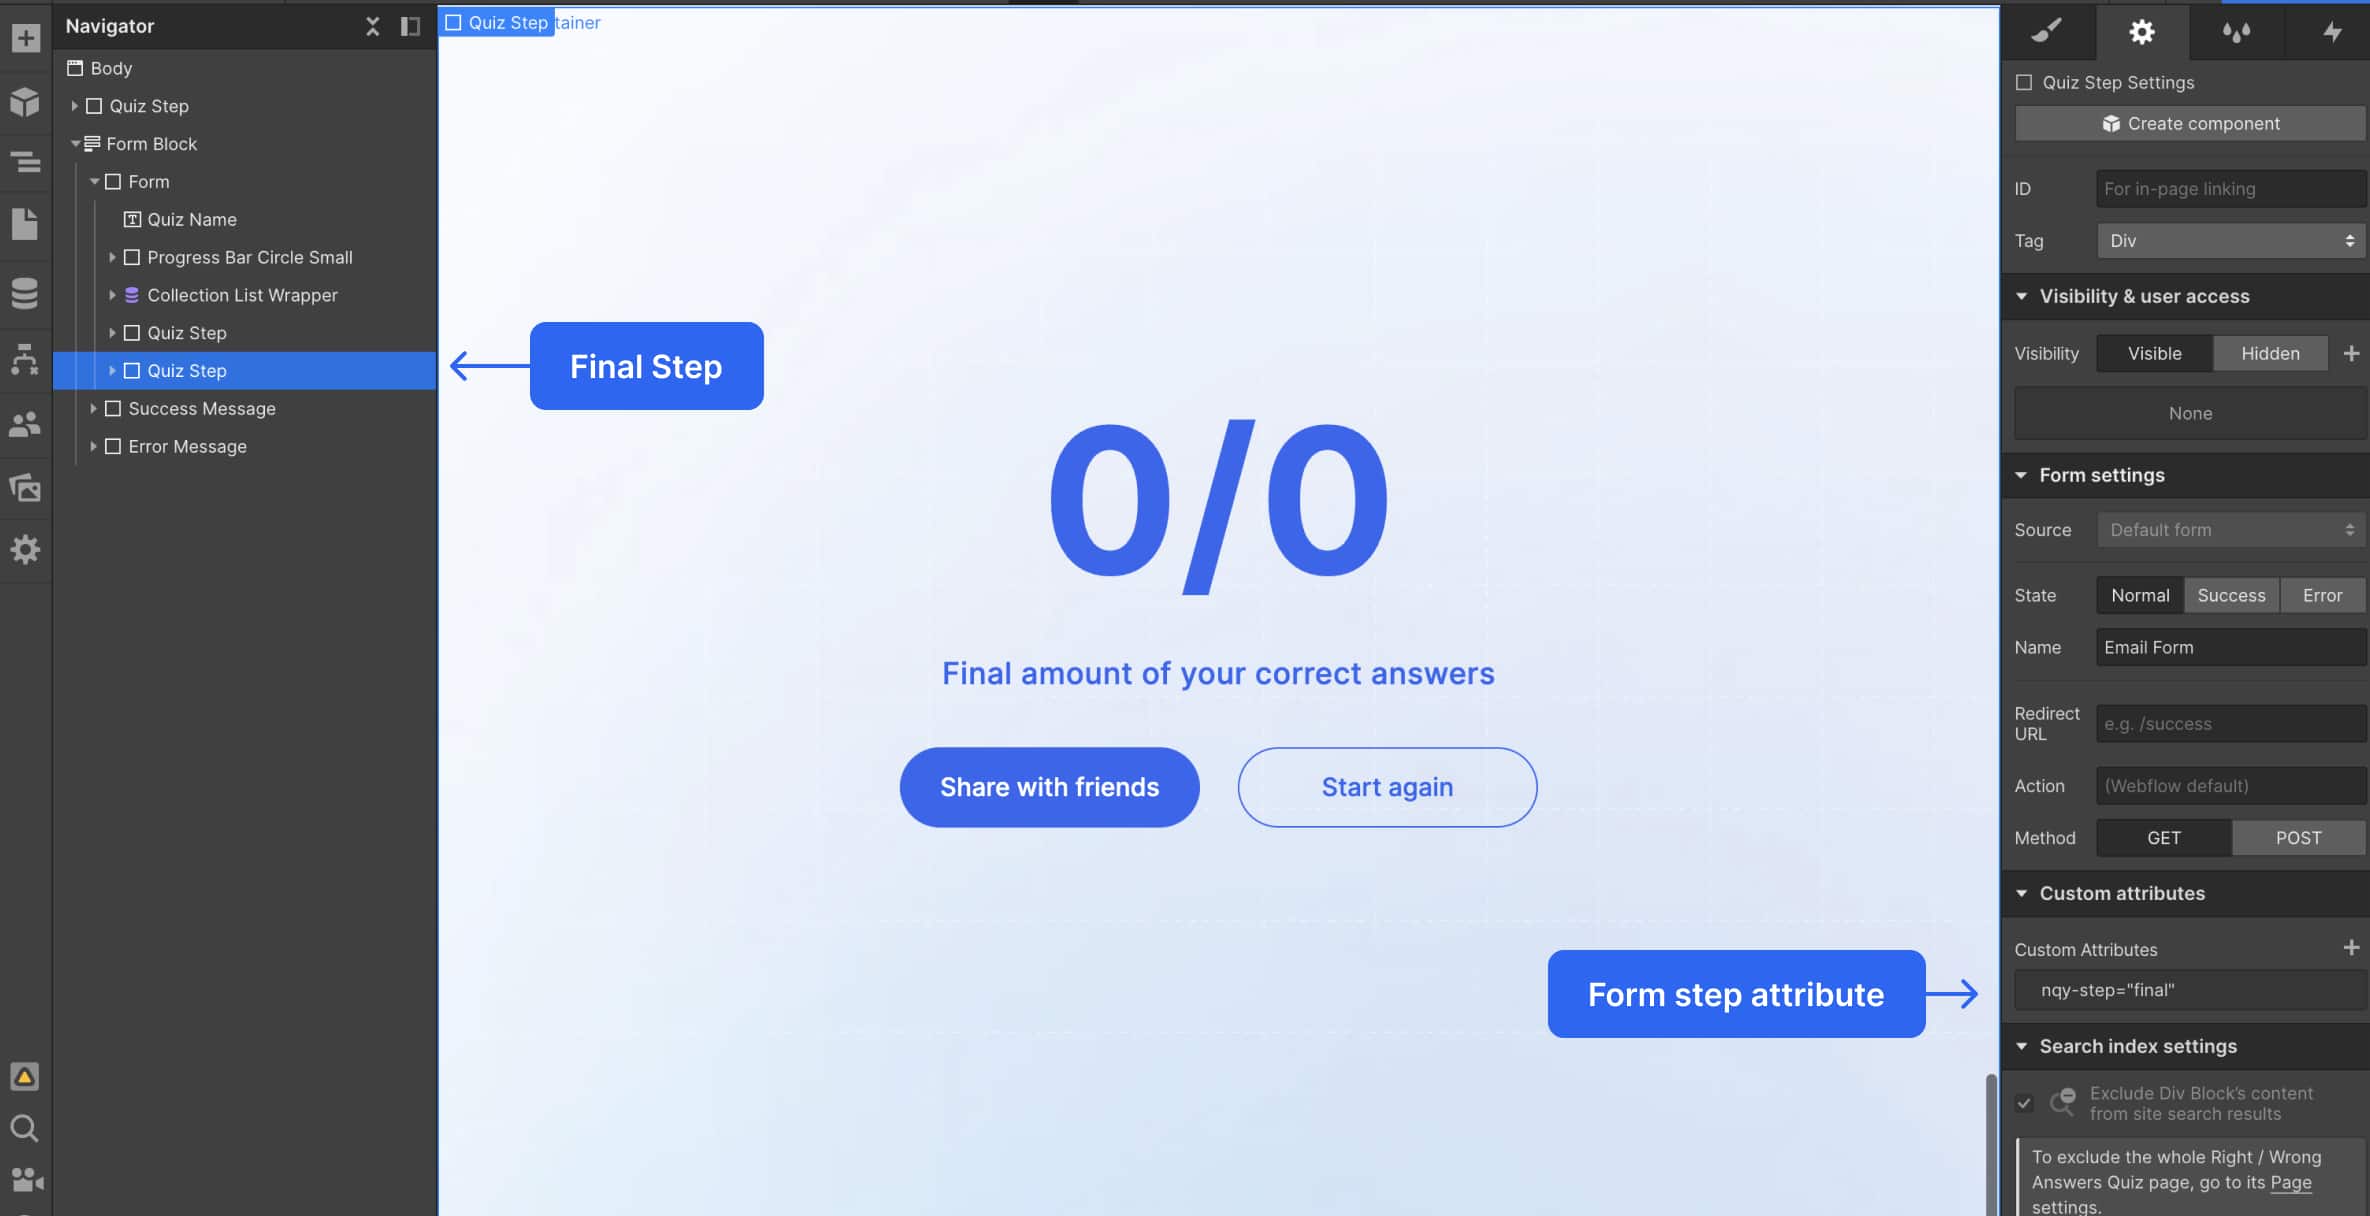
8. Final screen
This is the end game for your quiz player. It can be a simple message or can come with a login screen, (if you want to use the database feature and track user sign up). It can include final points, number of right and wrong answers, and a custom message.
Make sure you added an nqy-step="final" attribute to each final screen - or simply copy any "Login" component from the library and put it inside the main form from the step 4. The necessary attributes are already set up!
Your final screen can be:
Make sure you added an nqy-step="final" attribute to each final screen - or simply copy any "Login" component from the library and put it inside the main form from the step 4. The necessary attributes are already set up!
Your final screen can be:
- A simple message.
- Message with the number of points (you scored this amount). To do that add an attribute nqy-result="points" to the text that should show the points amount
- Message with the number of right answers (4/10). To do that add an attribute nqy-result="answers" to the text that should show the number of correct answered questions and nqy-question="total" to the text that shows the number of all questions
- Custom message based on the scored right answers/points. To do that, add a collection or static div blocks with the custom messages inside the main form. Each custom message div block should have nqy-step="final" attribute and range attributes: nqy-range-from="minimum number" and nqy-range-to="maximum number", where minimum and maximum numbers are minimum and maximum points/right answers for this custom result.
9. Progress
To indicate the number of current questions, add this attribute to the text that should show the number nqy-question="current". To indicate the number of all questions add this attribute to the text that should show the number of all questions nqy-question="total". These attributes don't work very well with conditional logic as we might skip the questions and it might confuse the user, use it at your own risk.
To indicate progress, we have 3 options:
To indicate progress, we have 3 options:
- Simple progress bar - a stripe that would grow as the user proceeds through the questionnaire. Create a main wrapper for the progress bar and add a nqy-progress="progress" attribute. Inside the main wrapper add a div block, that would be an actual progress bar, add an attribute nqy-progress="progress-bar" to it and style the progress bar the way you want!
- Partial progress bar - set of blocks for each question, based on the number of answered questions the number of active blocks would also change. Create a main wrapper for the progress bar and add a nqy-progress="progress" attribute. Inside the main wrapper add a div block - wrapper for the blocks, add an attribute nqy-progress="progress-part" to it. Inside the wrapper for blocks add an actual element, that would represent a part (like one question/one step), add an attribute nqy-progress="part-element" and style it the way you want. The default element would be non-active. If you want to style an active state (as current question/step or answered question/step) add a combo class "active" to your part element with the attribute nqy-progress="part-element"
- Circle progress bar - a circle, that would fill in while the user goes through the questionnaire. Create a main wrapper for the progress bar and add a nqy-progress="progress" attribute. Inside the main wrapper add a div block - wrapper for the circle and current/total questions, and add an attribute nqy-progress="progress-circle" to it. Inside the wrapper for the circle add an actual circle element, add an attribute nqy-progress="progress-circle-element" and style it the way you want. Inside the nqy-progress="progress-circle" you can also add a text with current/total questions. Add an attribute nqy-progress="current" to a current question and nqy-progress="total" to the total amount of questions

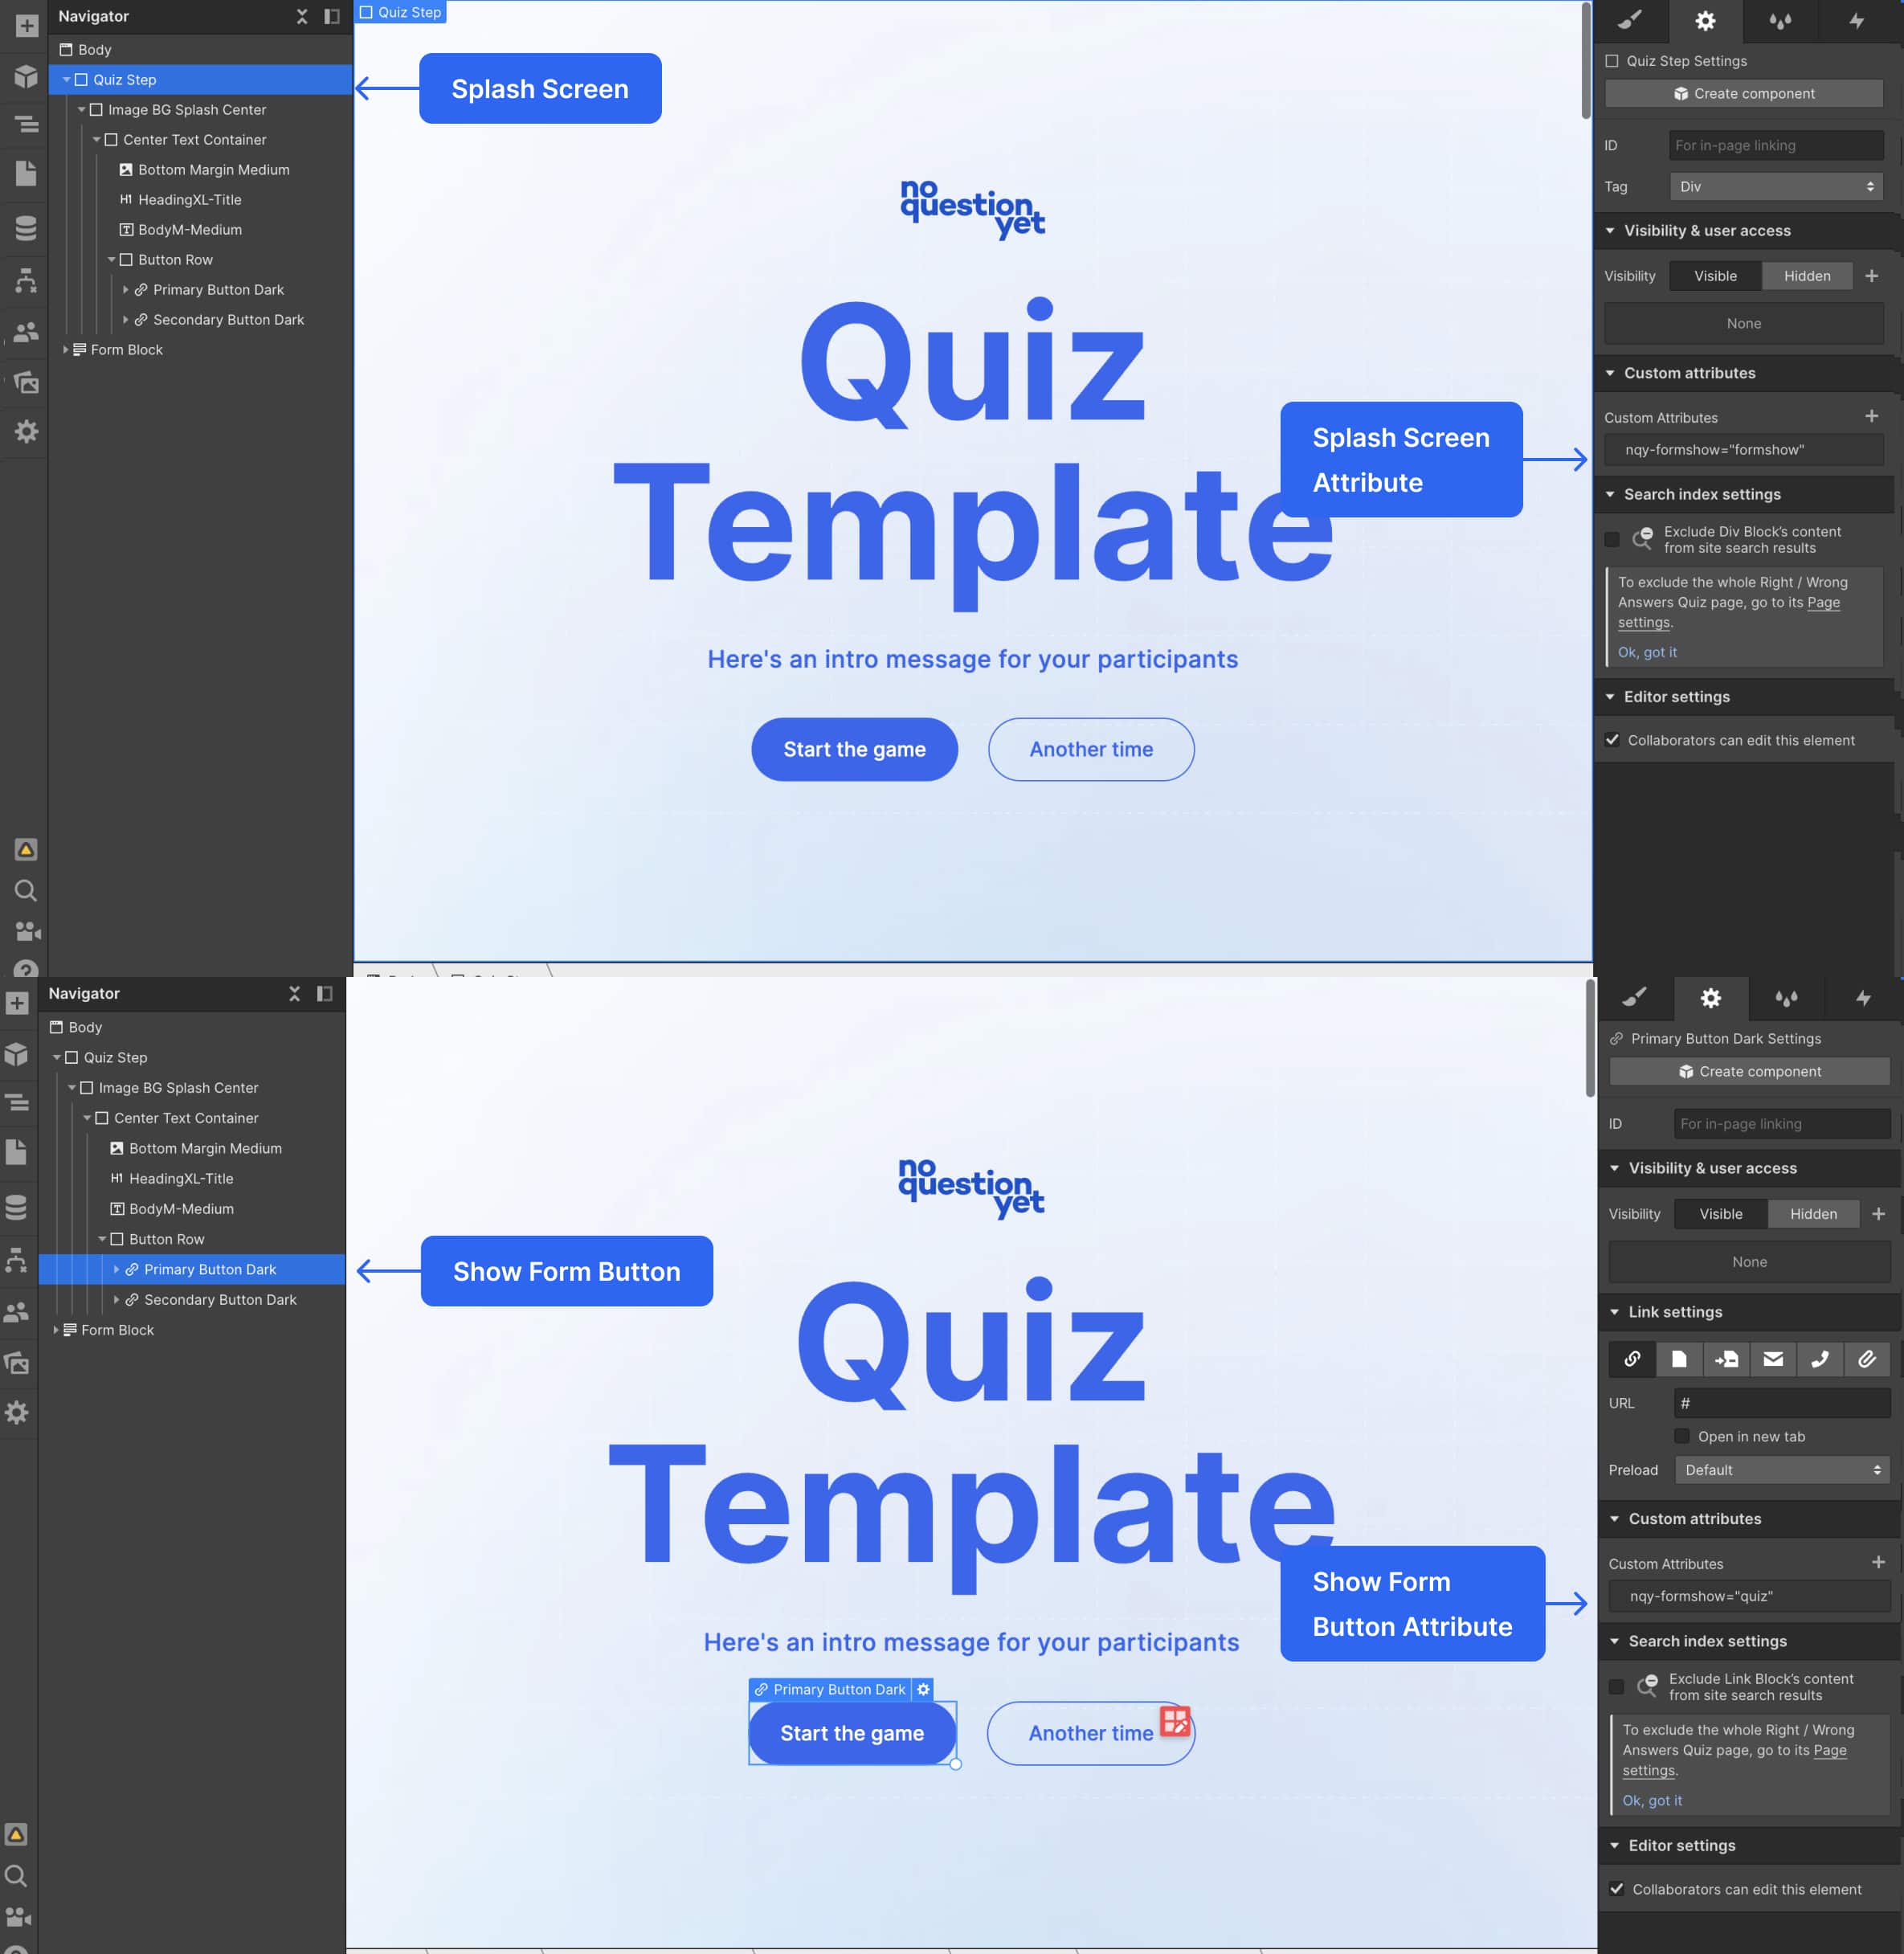
10. Splash screen
If you want to have a splash screen before the start of the quiz, add a div block with the necessary content and button/link. Add attribute nqy-formshow="formshow" to the splash screen div. The splash screen div should be OUTSIDE the main form. Add nqy-formshow="form-name" (where form-name could be anything you like: “quiz”, “onboarding”, “hello” etc.) attribute to the button in the splash screen div. Add the same attribute nqy-formshow="form-name" with the same "form-name" to an element with attribute nqy-form="form" - your main multi-step form.
11. Everything else is up to you!
As long as the 4 MUST HAVE components exist: Main Form, Form Steps, Action Triggers and Final Screen (inside the main form), your structure will work and it’s over to you to ramp up the design and change the steps in your flow.
Customize to your heart’s content. And look out for new components very soon. We will be posting the list of attributes used in the script shortly!
Customize to your heart’s content. And look out for new components very soon. We will be posting the list of attributes used in the script shortly!